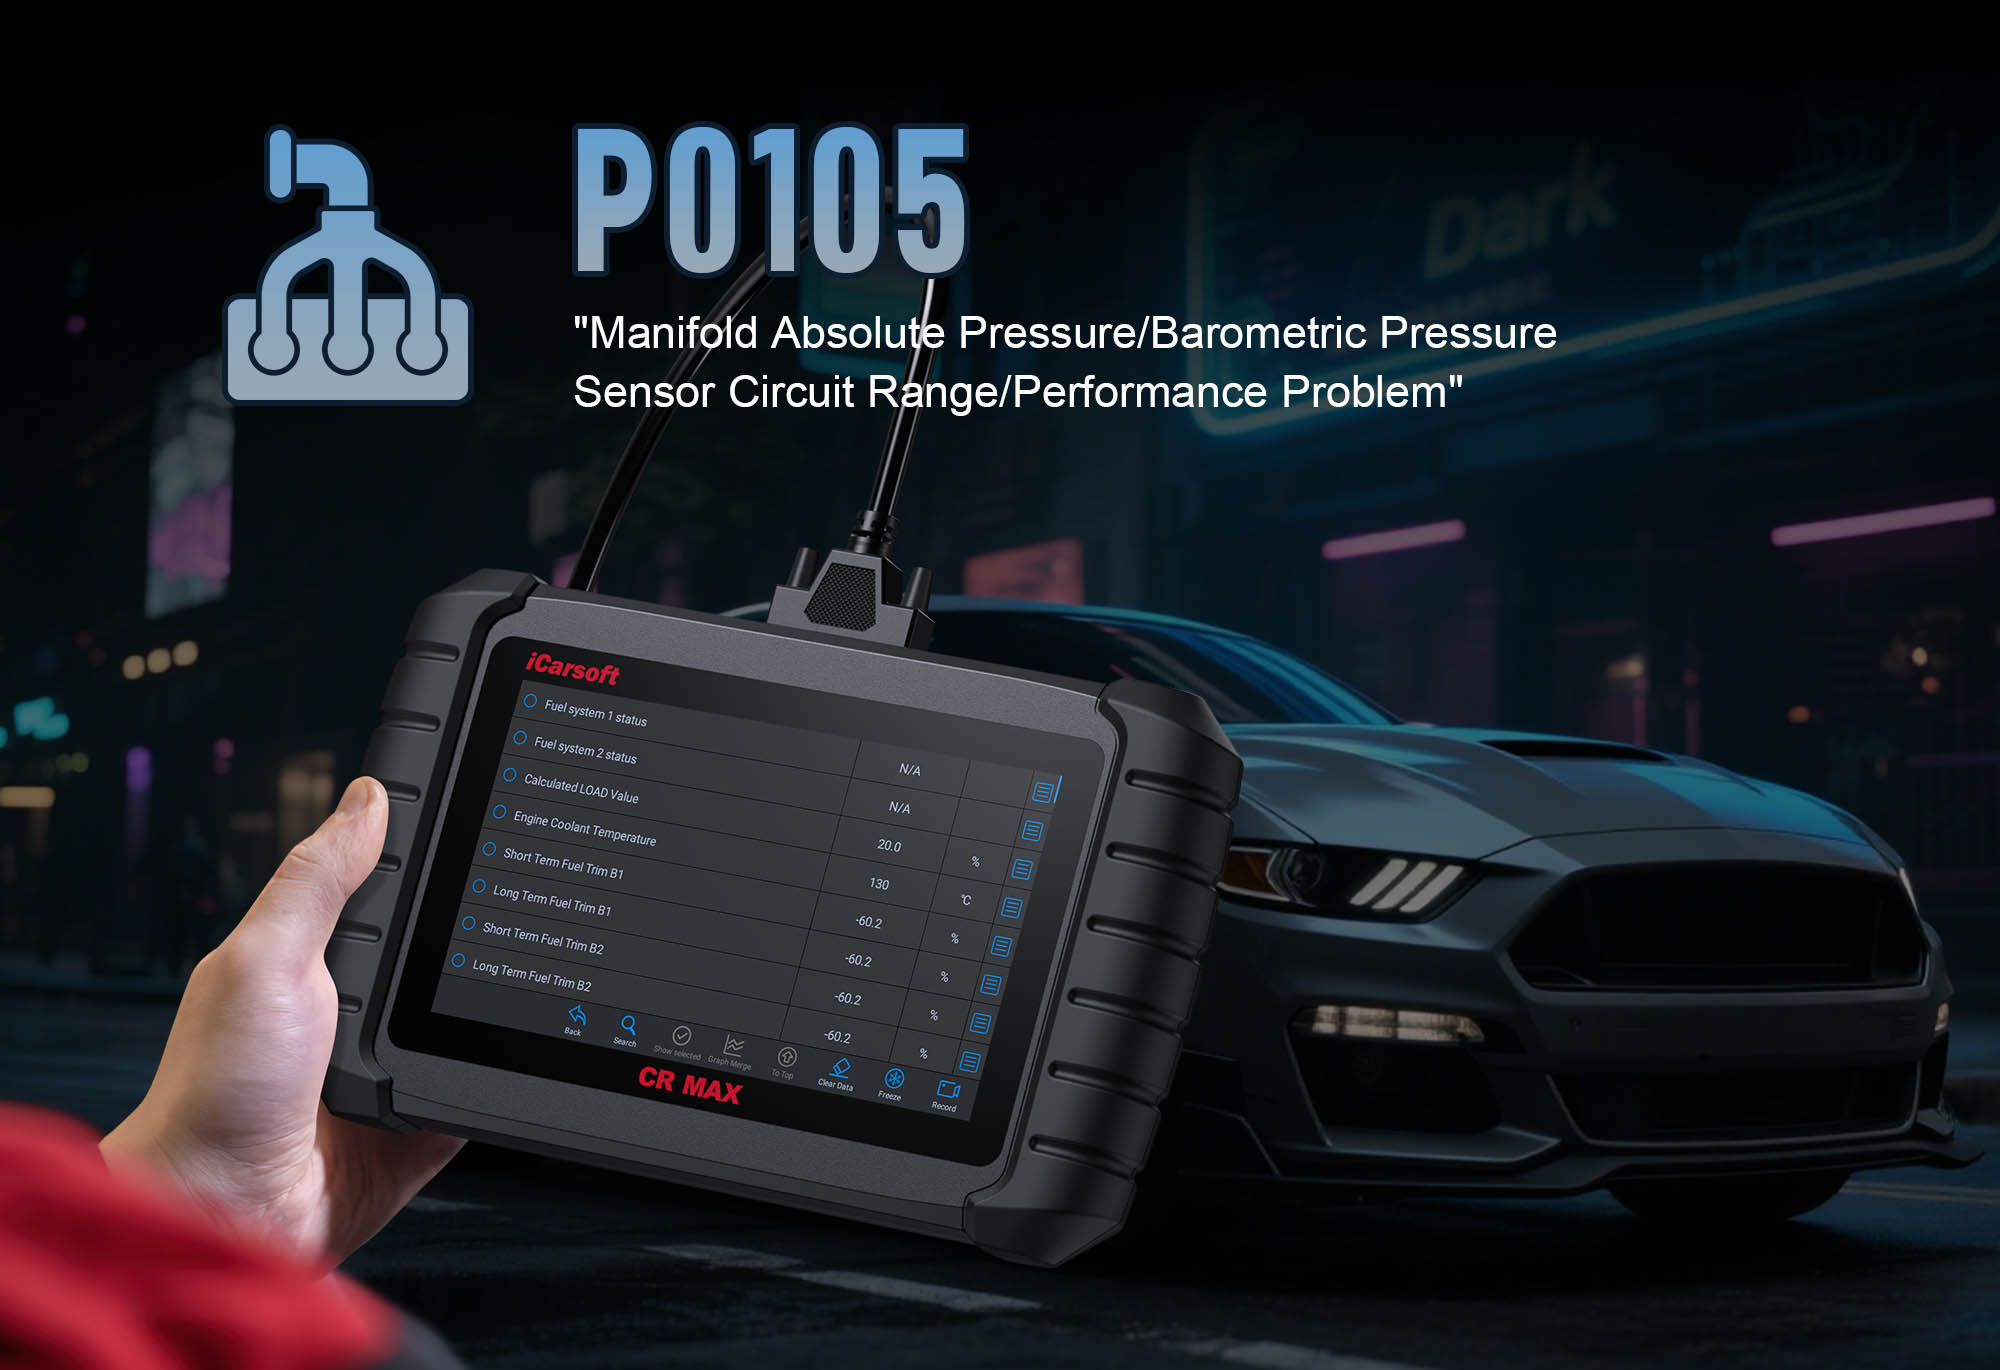
Diagnose & Clear P0105 with iCarsoft CR MAX: Fix Manifold Absolute Pressure Sensor Issues
If your check engine light illuminates and a scan returns P0105, your vehicle is signaling a problem with its intake system. This generic OBD-II code stands for "Manifold Absolute Pressure (MAP) Sensor Circuit Malfunction"—meaning the Engine Control Module (ECM) has detected abnormal voltage or no signal from the MAP sensor, which monitors pressure in the intake manifold.
The MAP sensor is critical for engine performance, translating intake manifold pressure (a measure of engine load) into electrical signals for the ECM. This data helps adjust fuel injection, ignition timing, and turbocharger boost (in forced-induction engines). When P0105 occurs, the ECM receives invalid pressure readings, leading to rough idle, hesitation during acceleration, increased fuel consumption, or even stalling—especially in turbocharged vehicles.
Basic scanners might only label P0105 as a "MAP sensor fault" but can’t distinguish between a failing sensor, damaged wiring, or a vacuum leak. The iCarsoft CR MAX solves this with sensor-specific diagnostics, real-time pressure monitoring, and vehicle-specific MAP sensor locations. Let’s walk through how to diagnose and resolve P0105.
Why It Matters
Ignoring P0105 disrupts the ECM’s ability to manage engine load, triggering a cascade of performance and reliability issues. For naturally aspirated engines, faulty MAP data causes erratic fuel injection—wasting gas (10–15% worse fuel economy) and leading to misfires that damage piston rings. For turbocharged vehicles (e.g., Subaru WRX, Dodge Challenger Hellcat), P0105 can cause underboost or overboost, risking turbocharger damage (a $1,500–$3,000 repair) or engine knock.
Long-term neglect also increases emissions (failing state tests) and strains the catalytic converter—unburned fuel from rich mixtures can overheat and destroy it. Addressing P0105 promptly with the iCarsoft CR MAX not only restores performance but also protects critical engine components from costly damage.
Understanding P0105: Causes & Key Symptoms
To tackle P0105 effectively, first map its impact on your vehicle’s MAP sensor and intake systems:
Key Symptoms of P0105
-
Illuminated Check Engine Light: Activates when the MAP sensor signal stays outside the normal 0.5V–4.5V range for 5+ consecutive seconds.
-
Rough Idle: Erratic fuel delivery from incorrect pressure readings causes the engine to shake or fluctuate in speed at idle.
-
Hesitation/Stumbling: Delayed throttle response during acceleration—engine "stumbles" as the ECM miscalculates fuel needs for the current load.
-
Increased Fuel Consumption: Rich fuel mixtures (from false low-pressure readings) waste gas and lower efficiency.
-
Reduced Power: Turbocharged engines underboost (lack power); naturally aspirated engines lose efficiency at high RPMs.
Common Causes of P0105
|
Cause
|
Description
|
|
Faulty MAP Sensor
|
Internal component failure (e.g., damaged pressure diaphragm) or contamination (oil, dirt) disrupts signal output.
|
|
Wiring Issues
|
Damaged insulation, corrosion in connectors, or loose terminals disrupt 5V reference voltage, ground, or signal transmission.
|
|
Vacuum Leaks
|
Leaks in vacuum hoses, intake manifold gaskets, or throttle body seals draw in outside air, causing false low-pressure readings.
|
|
Clogged Vacuum Line
|
Dirt, oil, or debris blocks the MAP sensor’s vacuum input, preventing it from measuring manifold pressure accurately.
|
|
ECM Problems
|
Rare, but a failing ECM may supply incorrect 5V reference voltage or misinterpret sensor signals.
|
Why iCarsoft CR MAX Excels at Diagnosing P0105
Basic OBD-II scanners can’t isolate MAP sensor-specific issues, but the iCarsoft CR MAX is tailored to MAP sensor diagnostics with these key features:
Sensor-Specific Data
Preloaded with MAP sensor specs (voltage ranges, vacuum line routing) for Dodge Challenger, Subaru WRX, Mercedes C-Class, and most makes/models.
Real-Time Pressure Monitoring
Displays live MAP sensor voltage (0.5V–4.5V) and calculated manifold pressure (kPa)—spots stuck or erratic readings instantly.
Circuit Integrity Tests
Verifies 5V reference voltage, ground connection, and signal wire continuity—eliminates wiring vs. sensor guesswork.
Vacuum System Diagrams
Shows exact MAP sensor location and vacuum line pathways to identify leaks, clogs, or disconnected hoses.
Fuel Trim Analysis
Compares short/long-term fuel trims (positive = rich, negative = lean) to confirm trends caused by faulty MAP data.
Auto VIN Detection
Automatically identifies engine type (naturally aspirated/turbocharged) to load accurate pressure/voltage parameters.
Step-by-Step: Diagnose P0105 with iCarsoft CR MAX
-
1. Connect & Confirm the Code
Plug the CR MAX into your vehicle’s OBD-II port (under the dashboard) and power it on. Select your vehicle via Auto VIN (fast and accurate) or manual entry (make/model/year). Navigate to Engine > Fault Codes > Read Codes to confirm P0105. Tap Code Details for vehicle-specific insights (e.g., "Dodge: MAP Sensor Signal Out of 0.4V–4.6V Range" or "Subaru: MAP Circuit Malfunction").
-
2. Check for Related Codes
P0105 rarely appears alone—scan for these companion faults to narrow the root cause:
- P0106/P0107/P0108: MAP Sensor Circuit Range/Performance, Low Voltage, High Voltage (specific circuit issues)
- P0171/P0172: System Too Lean/Too Rich, Bank 1 (confirms fuel mixture issues from bad MAP data)
- P0234/P0299: Turbocharger Overboost/Underboost (turbo vehicles—MAP data controls boost)
Address these first—multiple codes may signal a shared problem (e.g., vacuum leak).
-
3. Locate the MAP Sensor
Use the CR MAX’s Component Location tool to find the sensor:
- Naturally Aspirated Engines: Mounted on the intake manifold, throttle body, or firewall (connected to a short vacuum hose).
- Turbocharged Engines: Near the intercooler outlet or throttle body (may have a direct manifold connection, no vacuum hose).
The sensor has a 3–4 wire electrical connector (1 for 5V, 1 for ground, 1–2 for signal).
-
4. Monitor Live MAP Sensor Data
Use the CR MAX’s real-time data to spot pressure/voltage irregularities:
1. Go to Engine > Live Data > Intake System and select:
- "MAP Sensor Voltage" (target: ~0.9V at idle, ~4.0V under full load)
- "Calculated Manifold Pressure" (kPa—~100kPa with engine off, ~40kPa at idle for naturally aspirated)
- "Short-Term Fuel Trim (Bank 1)" / "Long-Term Fuel Trim (Bank 1)" (extremes = ECM compensation)
2. Start the engine and observe at idle, 2000 RPM, and light acceleration:
- Voltage stuck at 0V/5V = wiring fault or sensor failure
- No pressure change with throttle = clogged vacuum line or sensor issue
- Fuel trims >10% = rich mixture (false low-pressure reading)
-
5. Inspect the Sensor, Wiring & Vacuum Line
Visually examine the MAP sensor system (engine cool):
- Sensor Body: Check for oil contamination (sign of blown turbo seal/PCV leak), cracks, or physical damage.
- Electrical Connector: Inspect for green corrosion, bent pins, or water intrusion—clean with electrical contact cleaner.
- Vacuum Line (if equipped): Look for cracks, disconnections, or hardening (squeeze to test flexibility—brittle hoses = replace).
- Intake Manifold: Check for loose bolts or gasket leaks around the sensor mounting point.
-
6. Test the MAP Sensor Circuit
Use the CR MAX to verify electrical integrity (engine off, sensor disconnected):
1. Navigate to Special Functions > Engine > Sensor Tests > MAP Sensor Circuit.
2. Run three key tests:
- 5V Reference Check: Measure voltage at the sensor’s 5V pin (should be 4.8V–5.2V). No voltage = wiring break or ECM issue.
- Ground Test: Check resistance between the ground pin and battery negative (<0.5Ω). High resistance = corroded ground.
- Signal Wire Continuity: Verify no breaks between the sensor’s signal pin and ECM (use CR MAX’s wiring diagram for pin locations).
-
7. Check for Vacuum Leaks
Leaks disrupt pressure readings—test with the CR MAX’s guidance:
1. Use the CR MAX’s Vacuum System Diagram to identify test points (vacuum hoses, intake gaskets).
2. For sensor with vacuum hose: Disconnect the hose from the sensor, attach a hand vacuum pump, and apply 20 inHg pressure.
- Pressure holds for 30 seconds = no leak
- Pressure drops = leak in hose, manifold gasket, or throttle body seal.
3. For direct-mount sensors: Spray soapy water on intake gaskets (engine idling)—bubbles = leak.
-
8. Clean or Test the MAP Sensor
Address contamination before replacing the sensor:
1. Remove the MAP sensor (follow CR MAX’s Service Manual for torque specs—typically 8–10 ft-lbs).
2. Clean the sensor element with mass airflow sensor (MAF) cleaner (avoid touching the element or using brake cleaner).
3. Reinstall and retest with the CR MAX:
- P0105 persists = faulty sensor (replace)
- Code clears = contamination was the issue.
-
9. Repair & Clear P0105
Fix the root cause based on diagnostics:
- Faulty Sensor: Use the CR MAX’s Part Lookup to find OEM parts (e.g., Bosch 0261230034, Denso 22204-0A010).
- Vacuum Leaks: Replace cracked hoses, worn gaskets, or tighten loose manifold bolts.
- Wiring Issues: Splice frayed sections with heat-shrink connectors; replace corroded connectors and apply dielectric grease.
- Clogged Line: Flush the vacuum line with MAF cleaner or replace it.
Clear the code: Navigate to Engine > Fault Codes > Clear Codes to delete P0105.
-
10. Verify the Repair
1. Take a 15-minute test drive, including:
- Idle (check for smoothness)
- Acceleration (0–60 mph to test load response)
- Cruise (steady speed to monitor fuel trims)
2. Use the CR MAX’s Data Logging to record MAP voltage, manifold pressure, and fuel trims.
3. Re-scan after the drive:
- No P0105 + voltage/pressure matching throttle input = successful repair
- Code returns = revisit vacuum leak or wiring tests
Preventing P0105 Recurrence
Use the iCarsoft CR MAX to maintain reliable MAP sensor performance long-term:
-
Regular Inspections: Check vacuum hoses during oil changes—replace brittle/cracked ones (set reminders via CR MAX’s Maintenance Reminder).
-
PCV System Maintenance: Service the PCV valve per manufacturer intervals (15,000–30,000 miles)—a failing valve causes oil contamination of the MAP sensor.
-
Wiring Protection: Secure MAP sensor harnesses away from heat sources (exhaust manifolds, turbochargers) with zip ties to prevent insulation damage.
-
Sensor Cleaning: Include MAP sensor cleaning in 30,000-mile service (use MAF cleaner) to remove dirt/debris.
-
ECM Updates: Use the CR MAX’s One-Key Upgrade to install manufacturer calibration updates—fixes software bugs that misinterpret MAP data.
Summary Table
|
Step
|
Action
|
|
1
|
Connect CR MAX, confirm P0105, and review vehicle-specific code details
|
|
2
|
Scan for related MAP/fuel trim/turbo codes to narrow root cause
|
|
3
|
Locate the MAP sensor using Component Location tool
|
|
4
|
Monitor live MAP voltage, manifold pressure, and fuel trims
|
|
5
|
Inspect sensor, wiring, and vacuum line for damage/contamination
|
|
6
|
Test MAP circuit (5V reference, ground, signal continuity)
|
|
7
|
Check for vacuum leaks with hand pump or soapy water
|
|
8
|
Clean and retest the MAP sensor; replace if faulty
|
|
9
|
Repair faulty components and clear P0105
|
|
10
|
Test drive, log data, and re-scan to verify repair
|
Conclusion
P0105’s "circuit malfunction" label can be misleading—what seems like a faulty MAP sensor might actually be a $5 vacuum hose or corroded connector. The iCarsoft CR MAX eliminates guesswork with sensor-specific tools, real-time pressure monitoring, and vacuum system guidance, ensuring you fix the root cause (not just replace parts).
Whether you’re servicing a turbocharged Subaru WRX or a naturally aspirated Mercedes C-Class, the CR MAX guides you through every step—saving time and avoiding unnecessary costs (OEM MAP sensors cost $40–$200, so misdiagnosis wastes money). By resolving P0105 promptly, you’ll restore fuel efficiency, protect your engine/turbocharger, and keep your vehicle running reliably for years.
FAQs About P0105 Code
Q: Can I drive my vehicle with P0105?
A: Short emergency trips (e.g., to a repair shop) are possible, but avoid long drives—especially in turbocharged vehicles. Faulty MAP data causes poor fuel economy and can lead to turbo overboost/underboost (risking damage) or engine misfires. If you notice stalling or hesitation, stop driving immediately.
Q: Will replacing the MAP sensor always fix P0105?
A: No—only if the sensor itself is faulty. The CR MAX’s tests confirm this: if circuit tests (5V, ground, continuity) pass and no vacuum leaks exist, replace the sensor. If leaks or wiring issues are present, replacing the sensor ($40–$200) won’t resolve P0105.
Q: Why does my turbocharged vehicle have P0105 without a vacuum hose?
A: Many modern turbocharged vehicles use "direct-mount" MAP sensors (no vacuum hose) that measure pressure directly from the intake manifold. P0105 in these cases is often due to a faulty sensor, wiring issue, or manifold gasket leak (not a clogged hose). Use the CR MAX’s vacuum diagram to confirm your sensor type.
Q: How much does it cost to fix P0105?
A: Costs vary by cause: MAP sensor replacement = $40–$200 (DIY); Vacuum hose replacement = $5–$30 (DIY); Intake gasket repair = $100–$400 (professional); Turbocharger repair = $1,500–$3,000 (professional). The CR MAX helps avoid expensive fixes by identifying low-cost issues first.